Make Your Own Placemat
|
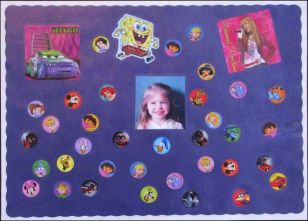
When you make your own placemat, it makes the chore of setting the table lots more fun! |
These
DIY placemats are covered with clear contact paper that I use like
laminating film. They are easy to wipe off and stand up well to dirt
and stains.
Depending on the turnover of new children in care
and the amount of usage of the placemats, we make new ones every four to
six months.
Directions:
Supplies Needed:
- 1- Paper placemat per child (purchased at a party store)
- 1- 13 x 9 sheet of plain paper per child
- Assortment of Stickers
- Markers
- Photo of each child
- Clear contact paper
- Edging scissors
Children:
Give a placemat to each child. Glue a photo of the child in the middle of the placemat. (Photos allow the children to identify their own placemat when they are not old enough to read names.) Decorate with stickers. Letter stickers or markers can be used to write their names on their placemat. Glue the placemat to the plain paper to make a sturdier placemat.
Adult:
Cut two pieces of clear contact paper at least 1" bigger than the placemat on all sides. Place decorated placemat on a flat surface. Remove the backing from the contact paper. Holding the contact paper at each end and over the top of your finished project, let the middle drop down to the placemat and guide to each end.
Use edging scissors or straight scissors to trim the contact paper to 1/4" edge. Placemats are washable with a wet cloth.
Buying Supplies for this Project:
My favorite place to buy craft supplies is Discount School Supplies. Any time I can make things easier on myself, I'm all for it. Buying my supplies online allows me to save both time and money.
Supplies for this project that I purchased online, include:
 |
Marcia Reagan is the creator of DaycareAnswers and lives in Central Minnesota with her husband and two children. She's been an in-home daycare provider for over twenty years and loves to share her experience and passion for daycare with other providers. |

I have affiliate links. If you buy something through a link, I receive a small commission at no additional cost to you. That keeps this site free! To learn more, read my full Disclosure Policy. |
Other Preschool Projects:

All Daycare Providers and Childcare Providers Welcome!
